
Ever wanted to learn how to remove logos from your pictures? Or how to separate all the product variants into their own product pages? In this article, we share a growing list of Shopify dropshipping hacks to help you run your store more effectively. These tips include some of the most common issues store owners like you have asked about when just starting out.
So let’s get started!


8 Tips You Need to Know as a Shopify Dropshipper
1. Split variants into their own products
Have you ever imported a product into your store that had several different styles that all look completely different? Did you wish you could just separate them into their own product pages to so that more people could see all the styles? This tends to happen a lot in niches like electronics, fashion, beauty and more.
Fortunately, there’s one really simple way to do this.
- Open your dropshipping app
- Click on Import List
- On the product you want to split, click Action > Split Product
- All products become separated on their own product pages
Keep in mind that you’ll now have more products to write unique descriptions for (to avoid a duplicate content penalization from Google). However, it increases the likelihood that you’ll be found organically for long-tail keywords since you’ve divided the products accordingly. It also helps make navigation easier while allowing your customers to find products that would’ve otherwise been hidden.
(P.S. not all dropshipping apps offer this feature)
2. Take advantage of the AliScraper Chrome Extension
You can install the free AliScraper Chrome Extension to make it easier to fulfill orders for products that you sourced from AliExpress.
Actually finding products on from AliExpress can be done inside of AliScraper. You can see order data and reviews for AliExpress products within the app, which means the only time you’ll head over to AliExpress is when you fulfill your orders – which is where the Chrome extension comes in.
3. Set Up Tracking Information in Backend
Do you constantly get bombarded with questions about when products will be arriving? There’s a tool you can set up to give your customers the order shipment and tracking information they need.
An important note to mention that many new dropshipiping stores forget to fulfill orders in back end. Remember: fulfilling an order on Shopify doesn’t fulfill it in whatever dropshipping app you're using. You need to log-into the app to process the order, otherwise their systems won’t detect it.
You can set up the tracking information and order shipment details so that they get delivered to customers automatically to reduce the number of emails you send out regarding this.
- Go to the dropshipping app
- Settings > Connected Shops > Shop Settings >General Tab scroll down
- Under custom shipping tracking URL add this link: https://t.17track.net/en?nums=
- Then, make sure there’s a check mark under ‘Notify customers about order fulfillment’
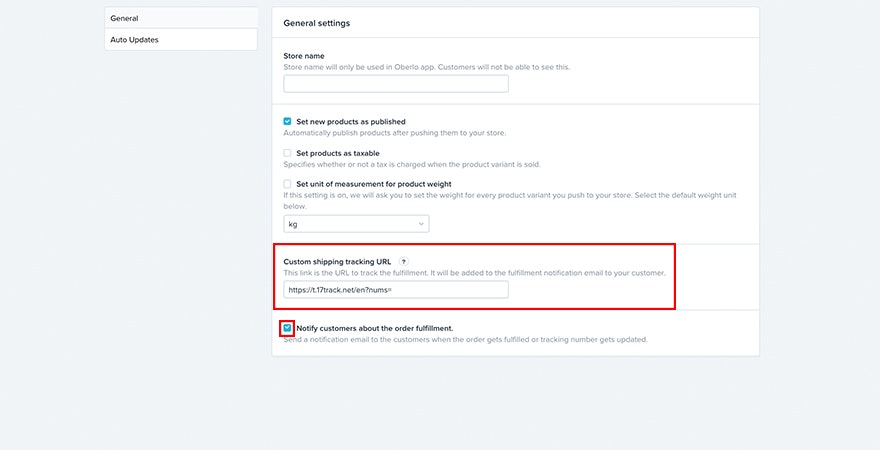
- Click Save Settings
- Then, you need to change the default email notification template
- First go to the Shopify admin > Settings > Notifications > Shipping confirmation
- Replace all the code in the Email Body (HTML) box with the code HERE
- View the Preview
- If a customer wants to receive the email again, hit the ‘Resend Email’ button on the Shopify > Orders > customer’s order page
- If a customer wants the tracking information prior to when you set it up, you need to go to the dropshipping app > Orders and click on the envelope button for their specific order

4. How to Stop Suppliers from Sending Invoices and Marketing Flyers
A supplier isn’t going to know you’re dropshipping unless you tell them. After receiving an order, they’ll likely assume it’s a new customer. So naturally, they might send invoices or marketing materials to them. But there is a way to stop them from doing so.
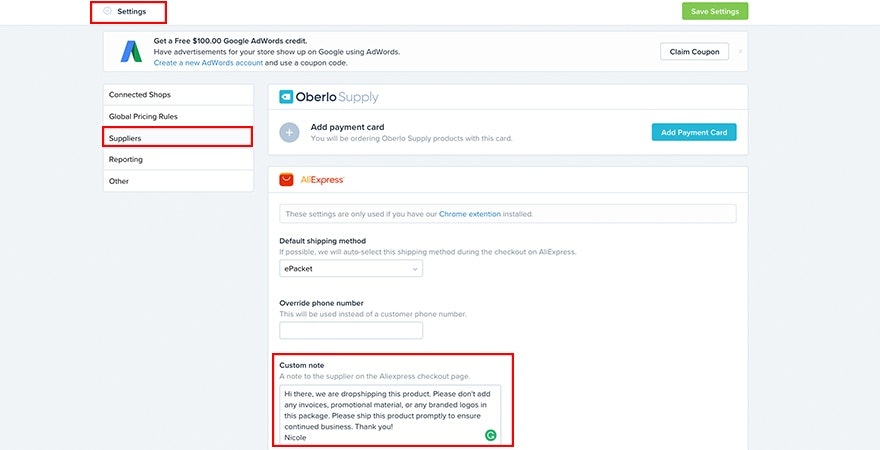
A custom note can be sent to every supplier to help prevent invoices and other marketing materials from being sent to the customer.
- Go to your dropshipping app
- Click Settings > Suppliers > Custom Note
- In the box, you can add text that reads, “Hi there, we are dropshipping this product. Please do not add any invoices, promotional material or any branded logos in this package. Please ship this package promptly to ensure continued business. Thank you! (your name)”

5. How to Choose ePacket as Your Preferred Shipping Method
Do you want your products to be shipped to customers in the cheapest and fastest way possible? ePacket shipping tends to be the most popular among dropshippers as your products can be delivered in as little as a week. The average shipping cost tends to be under $5 keeping your costs low while delivering within a time frame that’s more acceptable for the average consumer.
6. What’s the best payment gateways for your specific country?
Every country has its own set of payment gateways that work best for them. In the United States, PayPal is one of the most popular payment gateways, but PayPal isn’t available in every country. Fortunately, Shopify has created a list of popular payment gateways available for each country that can help you find the best one for your store.
7. How to Dropship Products on Non Shopify Websites
Do you have a WordPress blog or an online store on another platform? Do you wish you could sell products from tools like DSers on it? Luckily, products found on DSers can be sold on non Shopify websites simply by adding the Shopify Buy Button to those sites.

The Buy Button works on WordPress, Squarespace, Tumblr, your own website or wherever you’ve built an audience. By adding the Buy Button to a non-Shopify platform, you’ll benefit from having product pages, an embedded cart, and a secure checkout. You’ll need to keep track of orders on your Shopify dashboard. All you need to do is add the Buy Button as a sales channel on your store to use this handy feature.
8. How to Change Suppliers for the Same Product
Did you come across a supplier who didn’t meet your expectations? If you’d like to change your supplier without changing your product page, you can easily do that on your dropshipping app.
- Go to your dropshipping app
- Go to the specific product
- Click Action > Override this Product
- Under Override With, add the link for the product you want as a replacement
- Click Override
Again, check whether the option is available for your dropshipping app before proceeding.
Did any of these dropshipping tips help make life as a dropshipper easier? Let us know which of these tips is your favorite!