You’ve got to be proactive.
If you want to be successful, you can’t sit back and wait for customers to come to you – reach out to them.
So where are they? Facebook.
Facebook is the largest social network in the world, with more than 1.96 billion people logging on daily.
That’s insane.
If you sell products online and you don’t have a Facebook shop, you’re missing a huge opportunity.
The Facebook shop feature isn’t just available to major retailers – anyone can get in on the action. For ecommerce store owners, it’s one of the most no-brainer ways of using social media marketing.
Plus, Facebook now allows you to set up a mobile-optimized store for people to access on both Facebook and Instagram. Its new feature, called Facebook Shops, makes it easy for users to discover, browse, and purchase your products on the platforms they use daily to enjoy new experiences.
In this article, you’ll learn everything you need to know about the new Facebook Shops feature. We’ll then show you the traditional way of creating aFacebook shop and how to integrate your Shopify store with Facebook. Plus, make sure that you stick around until the end to learn how to tag your products in Facebook posts.
Post Contents
- What Is Facebook Shops?
- What Is the Traditional Way of Creating a Facebook Shop?
- What Are the Benefits of a Facebook Shop?
- The Problem with Facebook Shops in 2023
- How to Set Up a Facebook Shop with Shopify
- How to Set Up a Traditional Facebook Shop Directly
- How to Tag Your Products in Facebook Posts
- Summary
- Want to Learn More?


What Is Facebook Shops?
Facebook Shops is a recently introduced feature that aims to ease the disruption caused by the COVID-19 pandemic.
It allows you to showcase your products on your Facebook page and Instagram profile in a way that offers a native shopping experience.
→ Click Here to Launch Your Online Business with Shopify
Facebook Shops give you the ability to create custom collections by grouping items from your inventory, making it easy for customers to discover your products.
Plus, you can present a distinct brand and storefront by customizing the layout and colors of your Facebook shop.
With full-screen images and customizable design, Facebook Shops lets you create a brand identity across Facebook and Instagram.

Small businesses typically struggle to move their business online, and right now, many of them are worried about the state of their storefronts.
As people are being ordered to stay at home, they are having a hard time staying open and making enough money to stay in business.
With Facebook Shops, smaller retailers have an opportunity to weather the COVID-19 storm and gain even more customers than before.
After using Facebook Shops, customers will be able to access your store and see your collections from your Facebook business page, Instagram profile or Instagram Story.
And just like when you’re in a retail shop and offer support to potential customers, you’ll be able to connect with people through Messenger, WhatsApp or Instagram Direct to answer questions, provide tracking updates, and more.
Facebook also said that in the future customers will be able to view a business’ Facebook store and buy products right within a chat in these communication channels. Meaning you’ll get more opportunities to make sales via upselling and cross-selling.

Facebook Shops for Shopify Merchants
Shopify has been working with Facebook since 2015 to provide sellers with the best multi-channel commerce solutions. Now the company has partnered with Facebook to bring the new, mobile-first shopping experience to Shopify merchants.
Here’s what you can expect: If you’re already selling products on Shopify, Facebook Shops will become available to you as an additional sales channel and you’ll be able to use it to create a branded storefront on Facebook and Instagram.
After publishing your shop, you’ll also be able to customize it as well as curate product collections directly inside Facebook and Instagram.
And with Shopify’s integration, your inventory and items will stay in perfect sync with your ecommerce store, so you can manage your business from one place while providing an omnichannel customer experience.

Product checkout will also be powered by Shopify for store owners, with the company also offering Instagram Checkout to some merchants experimenting with the new feature.
Facebook Shops is expected to roll out to every merchant in the next few months, but you can get a head start by adding a Facebook channel on Shopify. Keep reading to learn how to set it up and how you can sync your existing products through the channel so you can customize your Facebook Shop once it becomes available.
What Is the Traditional Way of Creating a Facebook Shop?
Before Facebook Shops, the only way to create a Facebook storefront was to use the “Shop” tab on your Facebook Page.
Although a small number of businesses that use the Facebook Shop tab will be migrated to Facebook Shops, the majority will still need to wait for a global rollout.
Meaning that if you’re based in a country where Facebook’s features are slow to reach, you will have to take the traditional route to set up a Facebook shop.
Shop is a tab which you can configure on your Facebook page to promote and sell your products directly to Facebook users on the platform itself.
Here’s an example of a Facebook store from Shopify user Best Self Co:

When Facebook users click on a product, they’ll be shown an expanded product page. On this page, they can see product pictures and videos, and read the product description.

What Are the Benefits of a Facebook Shop?
Before we look at how to create a Facebook shop, it’s important to understand exactly how a Facebook store can help you grow your ecommerce business.
Here are the three main benefits of having a Facebook store, traditional or mobile-first:
1. You Can Tag Your Products in Facebook Posts to Boost Sales
Once you have a Facebook shop set up, you’ll be able to start tagging any of your products featured in your images.
This ensures that everyone who views your posts will become aware of the products you have available.
In the example below from Nike, you can see product listing thumbnails under the heading “Products shown.”
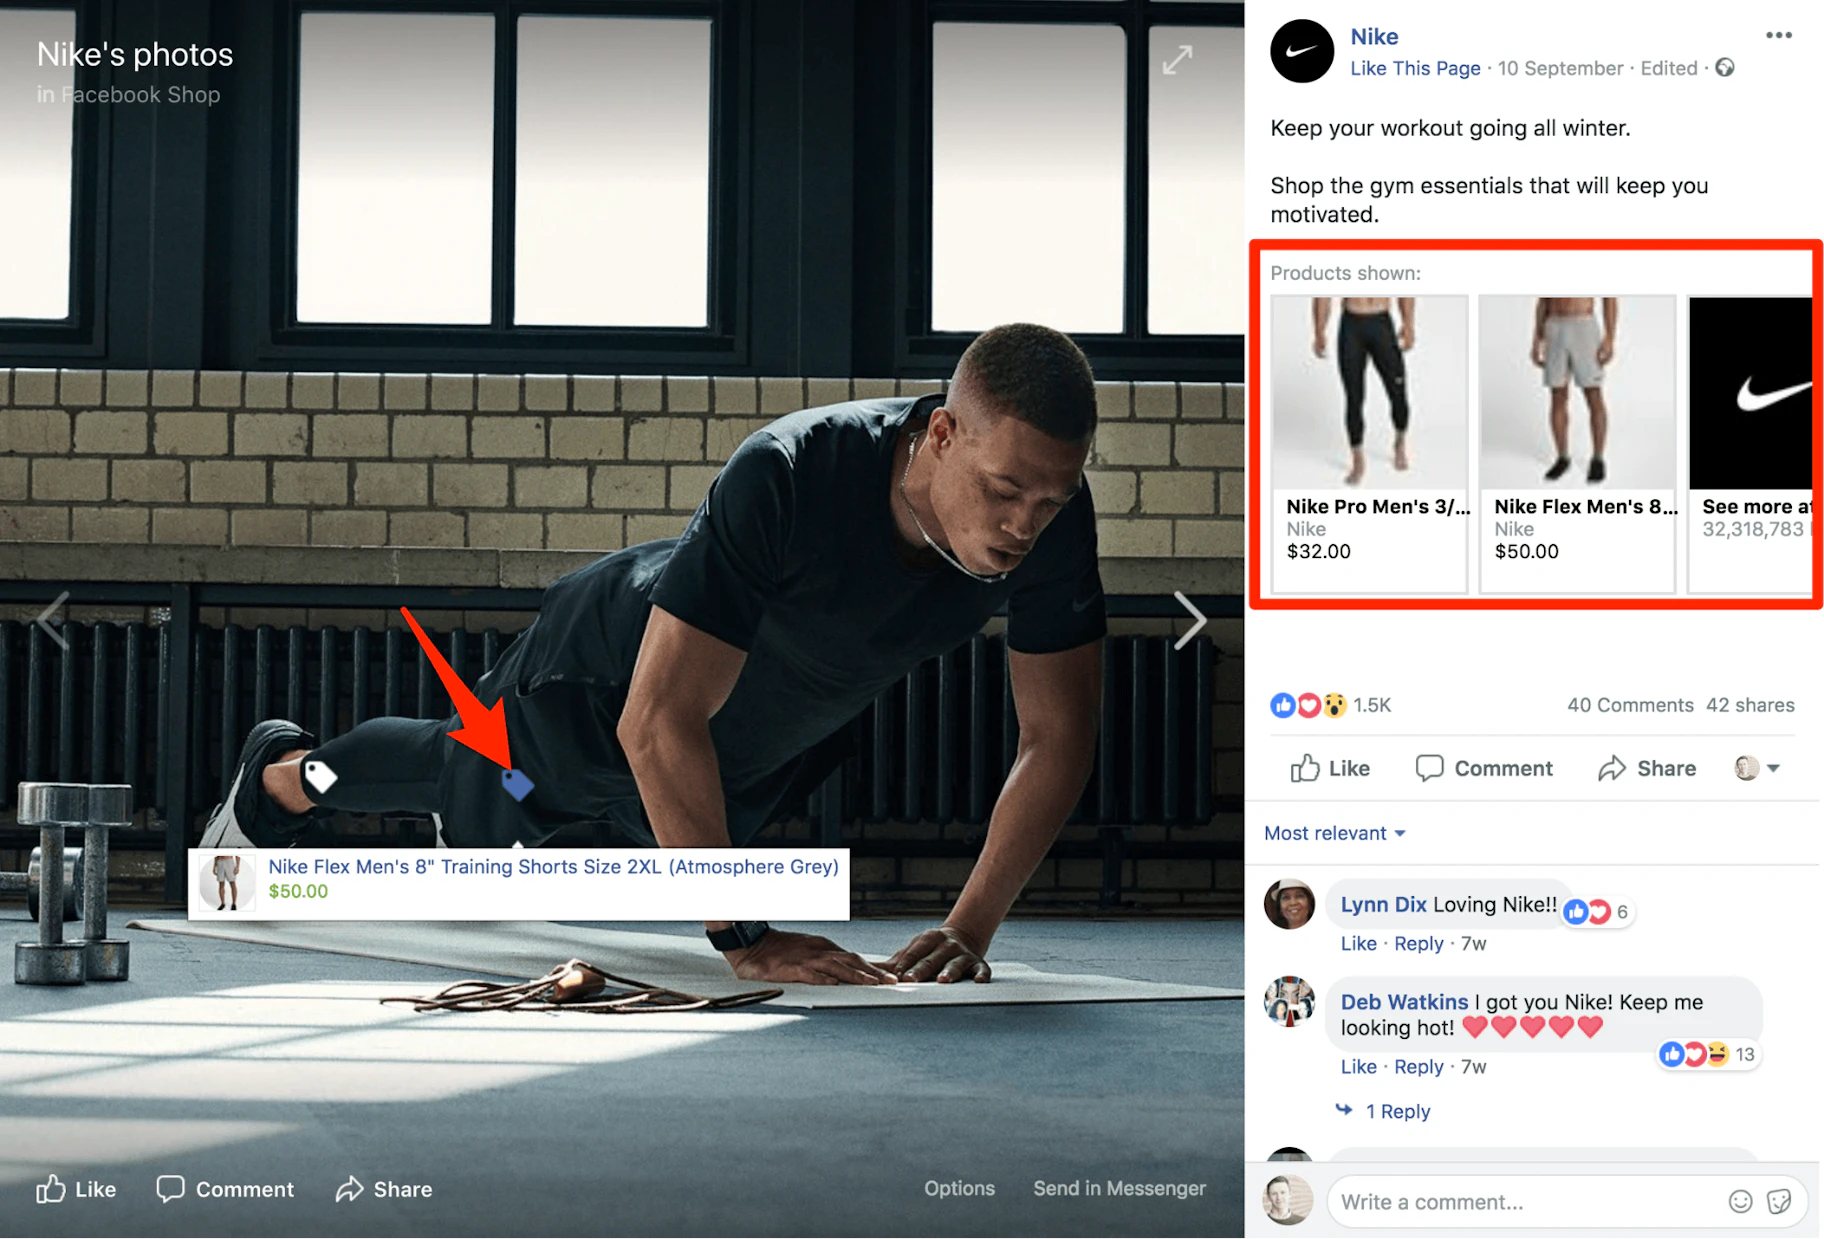
Plus, notice how each product in the image has a price tag icon? When users hover their mouse over the icon, product information is displayed.
Here’s the best part: Once you’ve set up your Facebook shop, tagging products in posts is quick and easy.
More on that in a minute.
2. You Can Tap Into Facebook’s Social Engagement
People hang out on Facebook.
Remember, the average daily user spends nearly an hour on the platform every day.
By using Facebook Shops or adding a Facebook Shop tab to your page, you can capitalize on the way users engage on Facebook.
Unlike your website, when people view your products on your Facebook store, they can Like them, save them for later, share them with friends, or leave a comment asking a question or sharing their thoughts.

Also, if you’re in the U.S. and have checkout enabled, customers can place an order without having to leave the platform.
Each of these actions will help to expose your brand to new people in the best possible way – through a friend.
These engagements work as a powerful form of social proof – meaning that people are heavily influenced by the opinions and actions of others.
3. A Facebook Shop Can Help to Reduce Friction in the Sales Process
You want to make it as easy as possible for people to purchase your products.
The more hoops you make customers jump through, the more likely they’ll give up or get distracted and not complete their purchase.
Simply put, a Facebook store makes life easier for Facebook users.
They can browse your products in the same window they’re using to chat with friends. Plus, they can add products to their cart and then check out on the platform, or head to your website to finish purchasing your products.
The Problem with Facebook Shops in 2023
Unfortunately, the Facebook Shops feature isn’t currently available in all countries. So, which countries can access the feature?
Good question – no idea.
Facebook isn’t super helpful in this regard, saying only, “Shops are being rolled out to businesses who sell with Instagram Shopping, a Facebook Page shop or both. We’ll send you an email when yours is ready.”

What’s more, even if you can access the Facebook Shop tab feature, Facebook only provides a shopping cart and checkout service for sellers in the U.S.
And once again, we don’t know when other countries can expect access to this feature.
However, it’s not all bad news.
If you’re not based in the U.S., you can still use a traditional Facebook shop as a sales channel to hook in new customers and send them to your website to check out by using the call to action, “Check Out on Website.”

Okay, now let’s look at how to set up a Facebook store with Shopify. Then, we’ll take a look at how to create a standalone Facebook store using the Shop tab on a Facebook page.
How to Set Up a Facebook Shop with Shopify
We recommend this route for serious sellers (and for existing Shopify users).
Why?
Firstly, you’re in control – your business won’t be completely dependent on the whims of future Facebook policies.
You’re also able to utilize Shopify’s powerful ecommerce management software.
#Win
Plus, Shopify allows you to integrate multiple sales channels.
This means that you can sell on your own website, Facebook, Messenger, Instagram, Amazon, eBay, and more, all from one dashboard.
In other words, it will make your life way easier.

Okay, ready to get to work?
Step 1: Create Your Shopify Store
If you don’t already have a Shopify store, head to Shopify.com and create an account.

Thankfully, Shopify offers a free trial, so you can test it out before committing.
However, to create a Facebook shop, you’ll need to sign up to one of Shopify’s plans, which start at just $39 per month.
When you’re done, you’ll be taken to your new Shopify dashboard – A.K.A. the command center of your future ecommerce empire.
At this point, Shopify will prompt you to add a product, customize your theme, and add a domain name.
It’s best to get your store set up now – for more help, check out: How to Set Up Your Shopify Store.
Also, if you don’t already have a Facebook page for your business, you’ll need to set one up before we can continue. For help, read our guide, 19 Easy Steps to Setting Up a Killer Facebook Business Page.
Done? Awesome!
Step 2: Connect Your Shopify Store to Your Facebook Page
Head to your Shopify dashboard, click “Sales Channels,” and then click the plus icon to add Facebook as a new sales channel.

Once you’ve done that, click “Connect Account” to connect Shopify with your Facebook account.

Facebook will ask you to allow Shopify to “manage your Pages and publish as Pages you manage” – click “OK” to continue.
Next, use the drop-down menu to select the Facebook page that you want to create a Facebook shop for. Once you’ve done that, click “Connect Page.”

At this point, you’re asked to read and agree to Facebook’s Seller’s Terms and Policies. Make sure to read these before clicking “Accept Terms.”
All done?
Okay, it can take up to 48 hours for Facebook to review and approve your store. In the meantime, let’s break down what you’ll do once you get the green light from Facebook.
Once Facebook has approved your store, you’ll need to sign up for one of Shopify’s plans and click “Enable” before you can start selling through your Facebook store.

Step 3: Choose Which Products and Collections to Show on Facebook
Now that you’ve linked your Shopify store to your Facebook page, it’s time to set up your Facebook shop.
To add products to your Facebook store, click the “Products” tab in your Shopify dashboard and select the products you want to add.
Next, click “Actions” to open the action menu, and then click “Make products available.”
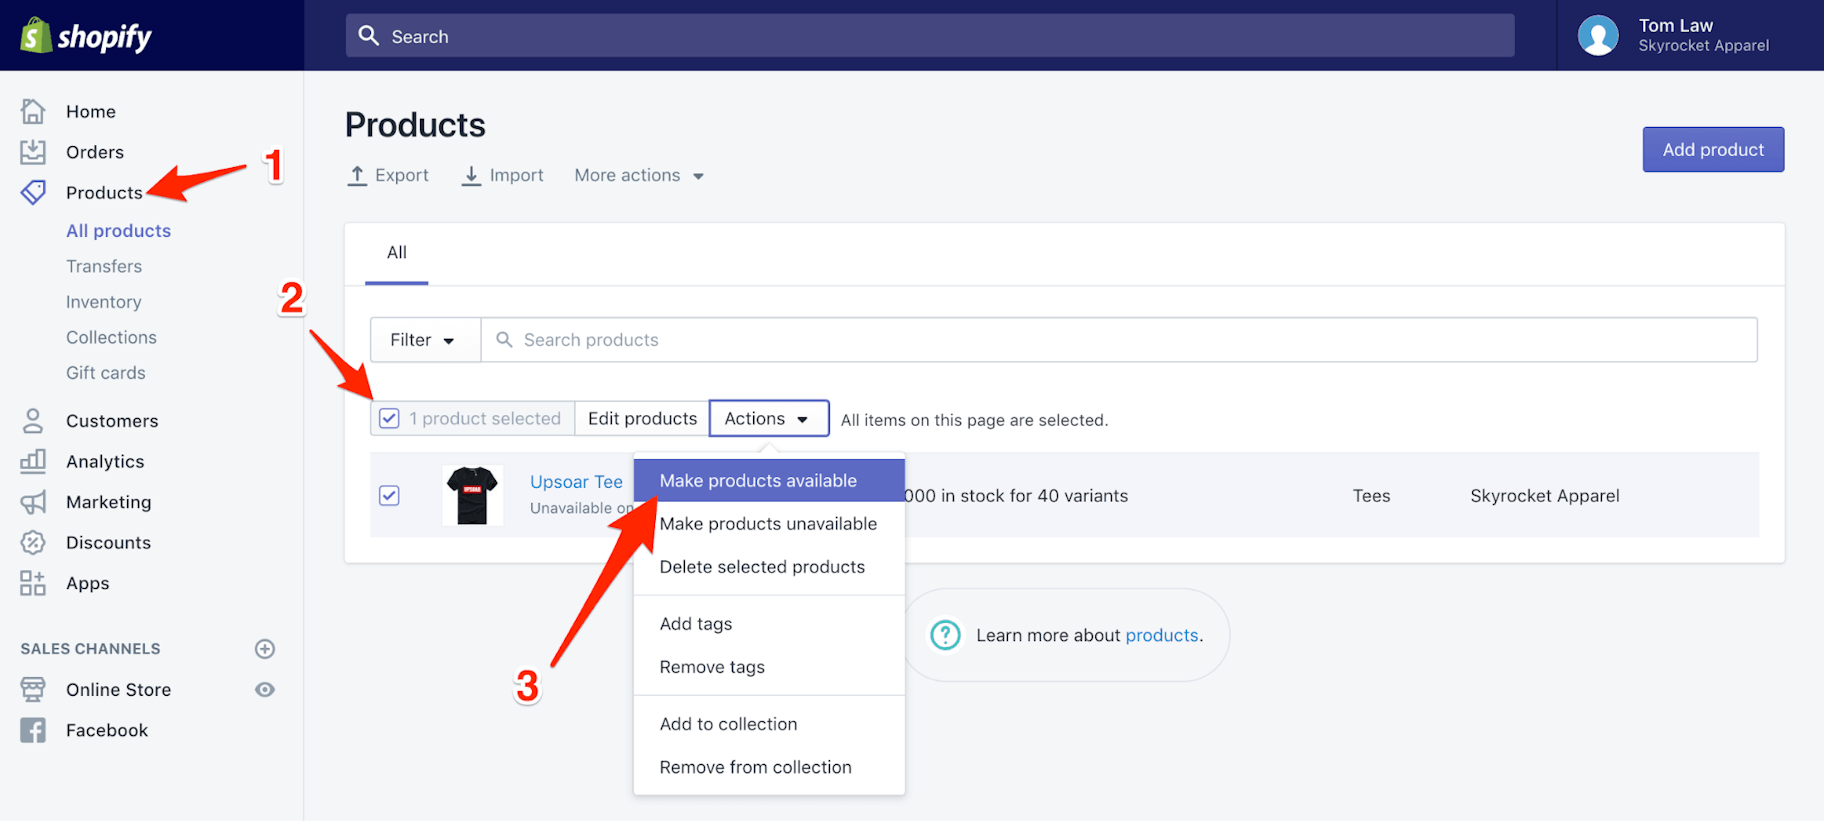

A popup window will ask you which sales channels you want the products to be displayed on. Check the box next to Facebook and click “Make products available.”

You can also add collections to your Facebook shop in the same way. Just click the “Collections” tab in the Shopify dashboard and repeat the process.
Now, to edit how products are arranged in your Facebook store, head to the “Publishing” tab under “Facebook” in the sidebar.
Here you can add, remove, and arrange collections of products shown in your Facebook shop.

Once you’re done, head to your Facebook page and you’ll see a new “Shop” tab featuring your products and collections.
Here’s an example from Shopify user KKW Beauty:

If you’d like to change the order of your Facebook page tabs, read “Step 1” of the next section.
Congratulations, you’re now the proud owner of a Facebook shop!
How to Set Up a Traditional Facebook Shop Directly
In this section, we’ll work through how to set up and manage a Facebook store using only the platform itself.
Again, if you don’t yet have one, make sure to set up a Facebook business page before continuing.
Okay, let’s jump in.
Step 1: Add the “Shop” Tab
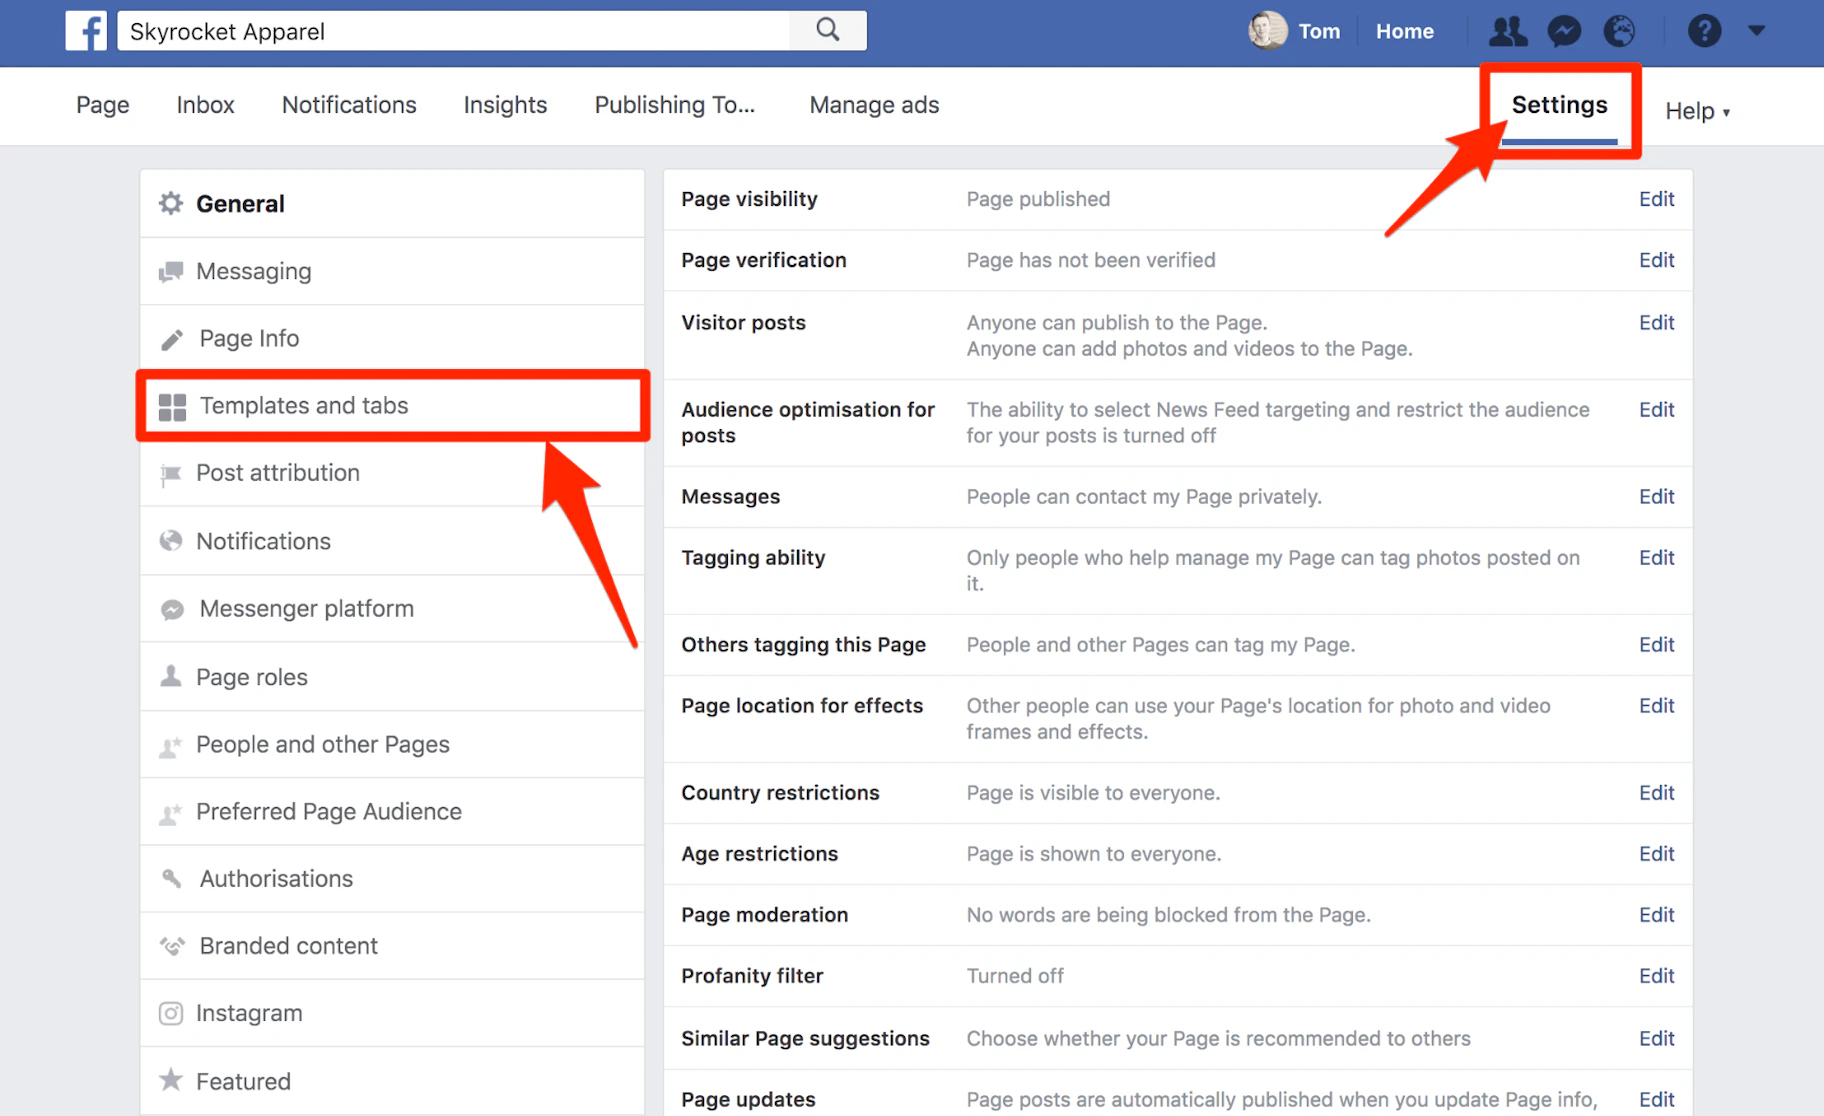
Navigate to your Facebook page and click “Settings.”
You’ll then be presented with a huge menu of Facebook page options. Now, click “Templates and tabs” so that we can add the Facebook shop tab.
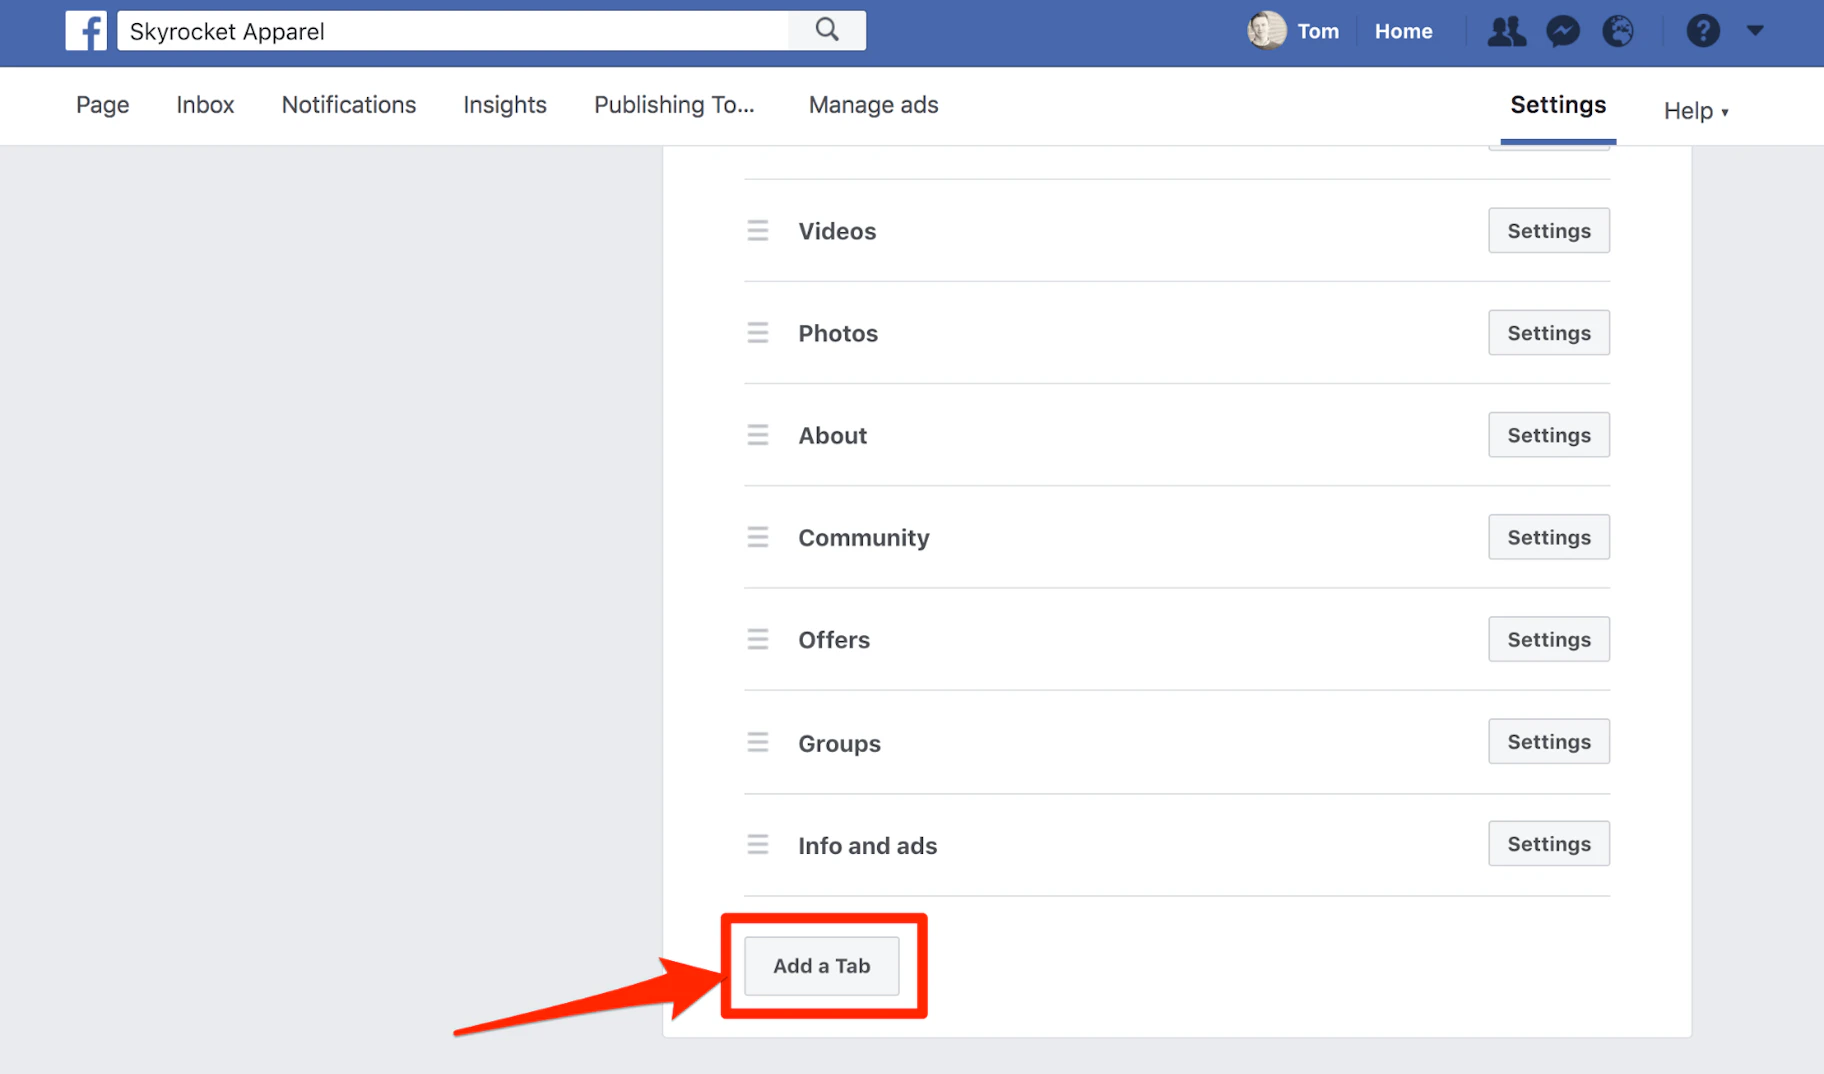
This will show you all of the tabs you’re currently using. Scroll to the bottom of the list and click “Add a Tab.”
Now, find “Shop” and click “Add Tab.”

If you’d like to rearrange the order of your tabs, just click the three horizontal lines and drag your tabs into your preferred arrangement.

However, when doing this, make sure that your shop tab is in the top three. This will ensure that it’s still visible when your tab list is shortened by the “See more” link.

Step 2: Configure Your Facebook Shop Tab
If your shop tab isn’t displaying correctly, head back to “Templates and tabs,” click on “Settings,” and make sure “Show Shop tab” is on.

Once you’ve done this, head back to your Facebook page and click on “Shop.”
To continue, you must agree to Facebook’s Seller’s Terms and Policies. Make sure to read these through before agreeing and clicking “Continue.”

Next, Facebook will ask you how you’d like people to purchase products from your shop.
Anywhere outside of the U.S. has two options: “Message to buy,” or “Checkout on another website.”

If you live in the U.S. you’ll also be given the option to accept payments directly from your Facebook page by linking your bank or Stripe account. (Click here to learn how to do this.)
Once you’ve chosen your payment method, it’s time to add products to your Facebook shop!
Step 3: Add Products to Your Facebook Shop
To start, head to your Facebook shop tab and click “Add Product.”

Next, upload your product photos and videos. Then, type in your product name, price, and include a compelling product description.
In this example, I opted to send buyers to a website to complete their purchase, so I would need to add the website’s URL for this specific product.

Now, Facebook has detailed guidelines and recommendations for product listings. Let’s take a quick look at some of the most important points.
Facebook Product Image Guidelines
You must:
- Include at least one image for each product listing
- The image must be of the product itself (it can’t be a graphical representation)
Ideally, you should use images that:
- Show all of the product
- Show the product up close in a well-lit setting
- Have a resolution of 1024 x 1024 or higher
- Are in the square format
- Have a white background
- Showcase the product in real-life situations
Don’t use images that contain:
- Text (e.g., calls-to-action or promo codes)
- Offensive content (e.g., nudity, explicit language, violence)
- Advertising or promotional material
- Watermarks
- Time-sensitive information (e.g., limited time offers)
Facebook Product Description Guidelines
Your descriptions shouldn’t include:
- HTML (Rich text only)
- Phone numbers or email addresses
- Long titles
- Excessive punctuation
- All the letters capitalized or in lower case
- Book or film spoilers
Ideally, your descriptions should:
- Only provide information directly related to the product
- Be concise and easy to read
- Highlight unique product features and benefits
- Be grammatically correct and properly punctuated
When you finish, make sure to click the toggle to enable sharing and then click “Save.”
At this point, you’ll need to wait for Facebook to review and accept your products. This usually takes a few minutes and Facebook will notify you when processing is complete and your products are visible.
Once your products are approved they’ll look like this:

Then, simply repeat this process until all of your products are added.
Step 4: Manage Your Products and Orders
To manage your products and orders, click the “Publishing Tools” tab at the top of your Facebook page, and click “Shop” near the bottom of the sidebar menu.

If you’re based in the U.S. and opted to allow users to checkout on Facebook, you’ll get a notification each time you receive a new order.
You also have an addition tab under the “Shop” menu to manage your orders.
Next up:
How to Tag Your Products in Facebook Posts
Let’s quickly run through how to tag your products in Facebook posts.
First, share a new Facebook post or bring up an old post featuring products that you’d like to tag.
Now that you have a Facebook shop tab with products on it, there’ll be an option to “Tag products” next to the usual “Tag photo” button.

Simply click “Tag Products,” select the product you’d like to tag and click “Finished Tagging.”
That’s it!
Now, whenever a user views your post, they’ll be shown thumbnails of your Facebook shop product listings alongside the image.

Summary
A Facebook store is an incredible opportunity to place your product offerings inside the most popular social media platform in the world.
Whether you create one through Facebook Shops or using the Shop tab on your Facebook page, you’ll get the opportunity to:
- Capitalize on Facebook’s incredible social engagement to expose your brand to friends of shoppers
- Tag your products in Facebook posts to boost sales
- Reduce friction in the sales process by allowing users to shop for your products without leaving the site
If you’re serious about selling online, it’s best to create a Facebook store using a service like Shopify.
This way, you’ll retain complete control over your business while also getting access to a suite of features designed solely to help you grow your bottom line.
If you’re based in a country without access to the Facebook Shops, don’t worry – it’s on its way. And in the meantime, you can set up a Facebook Page shop and take advantage of other features like Facebook Stories and Facebook Live to grow your store.
Do you have a Facebook store? Let us know about your experiences in the comments below!